Today, I’m very excited to share a tutorial on how to control your lamp or any simple electronic appliance with either voice-control or cross-platform application created with Xamarin.Forms.
What are we building?
First of all, let’s see how it works!
Sure, no world-changing technology was invented here, however, imagine the feeling when you to tap a button on your phone or just say “Hello” to your #nomorestupid / #smart lamp which you have build yourself:
Part I – Power Socket Control
Things you need
- Raspberry Pi with Windows IoT
- 5V Relay
- Power Socket Extension
- Plastic Junction Box
- Diode
- NPN Transistor
- 1K Resistor
Making of Power Socket extension controlled with 5V Relay
Our lamp is going to be switched in a way of plugging/unplugging a device directly into/from a power socket. This can be achieved by creating a power socket extension, which will have a relay connected to our Raspberry Pi.
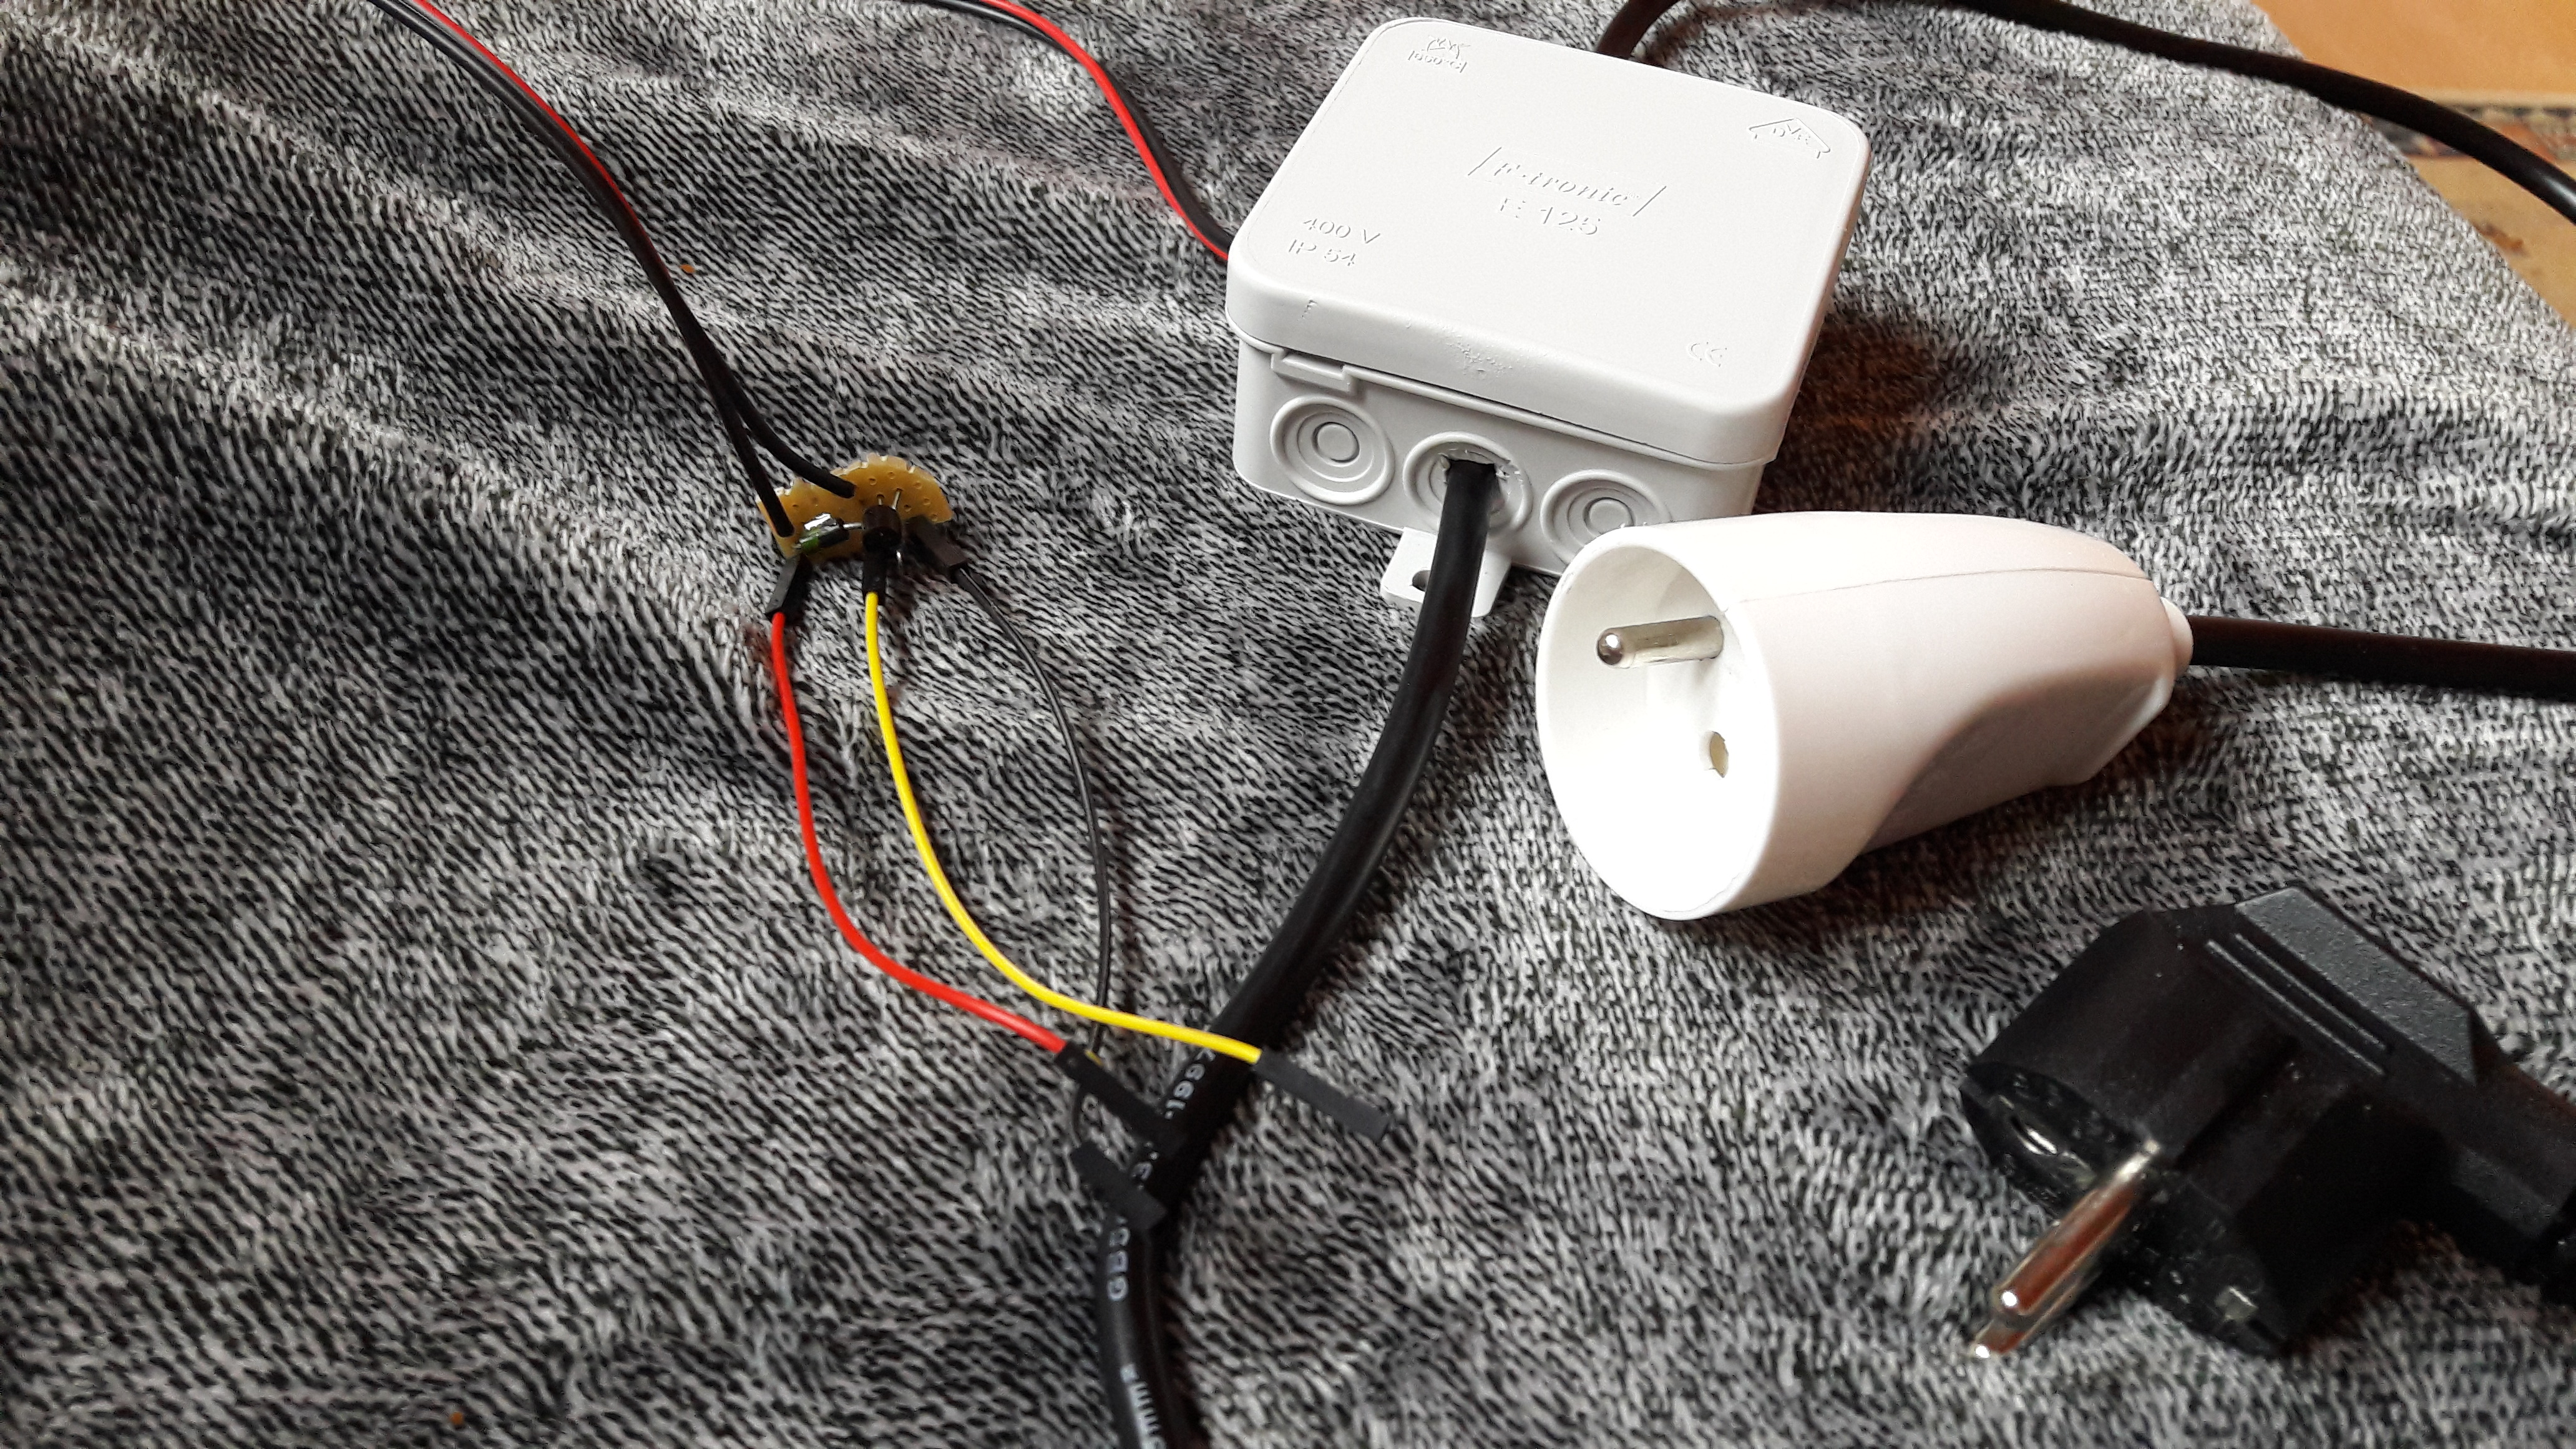
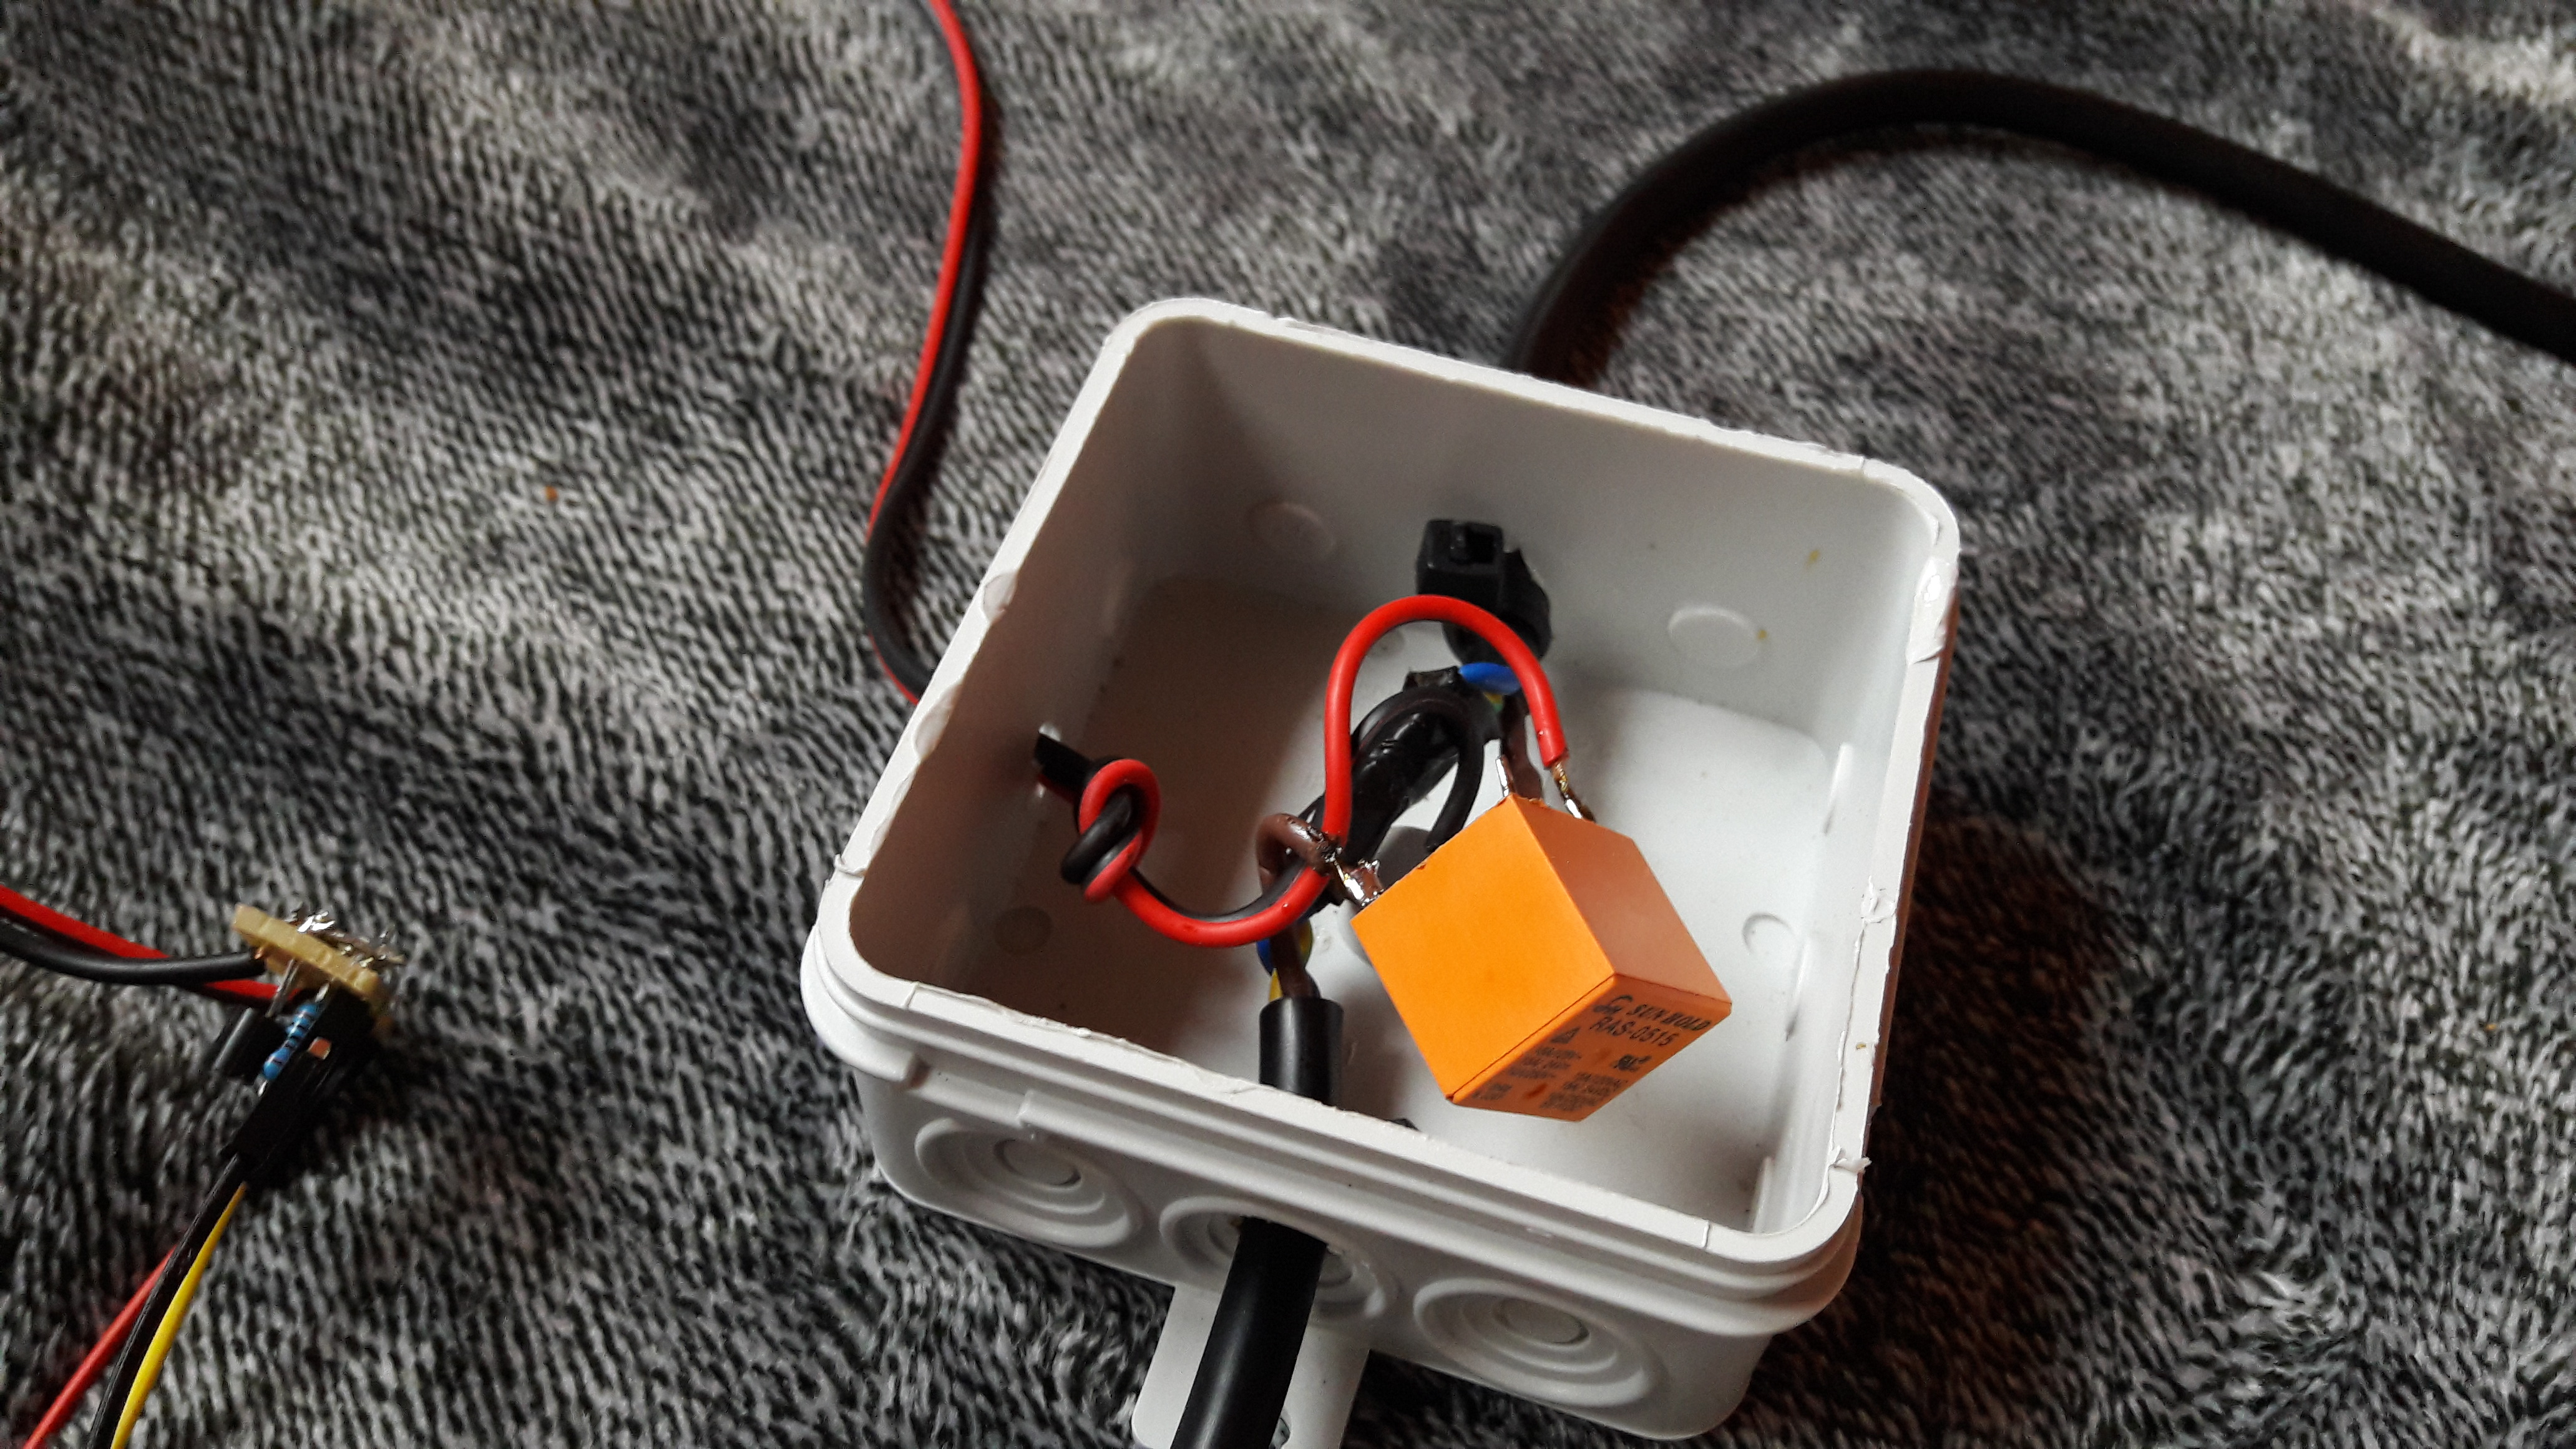
Cut the power extension in the middle and connect a relay inside a junction box:
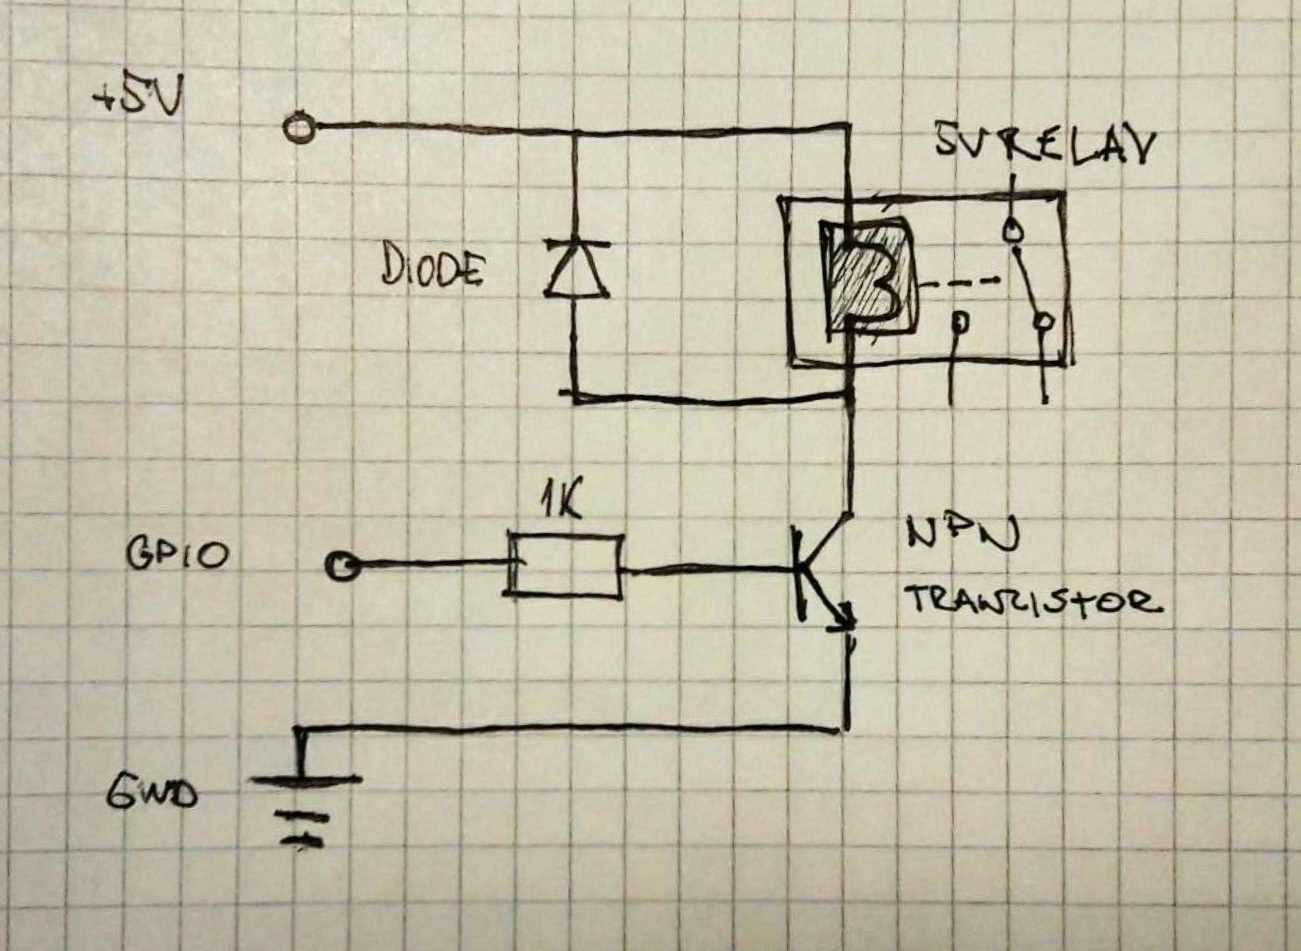
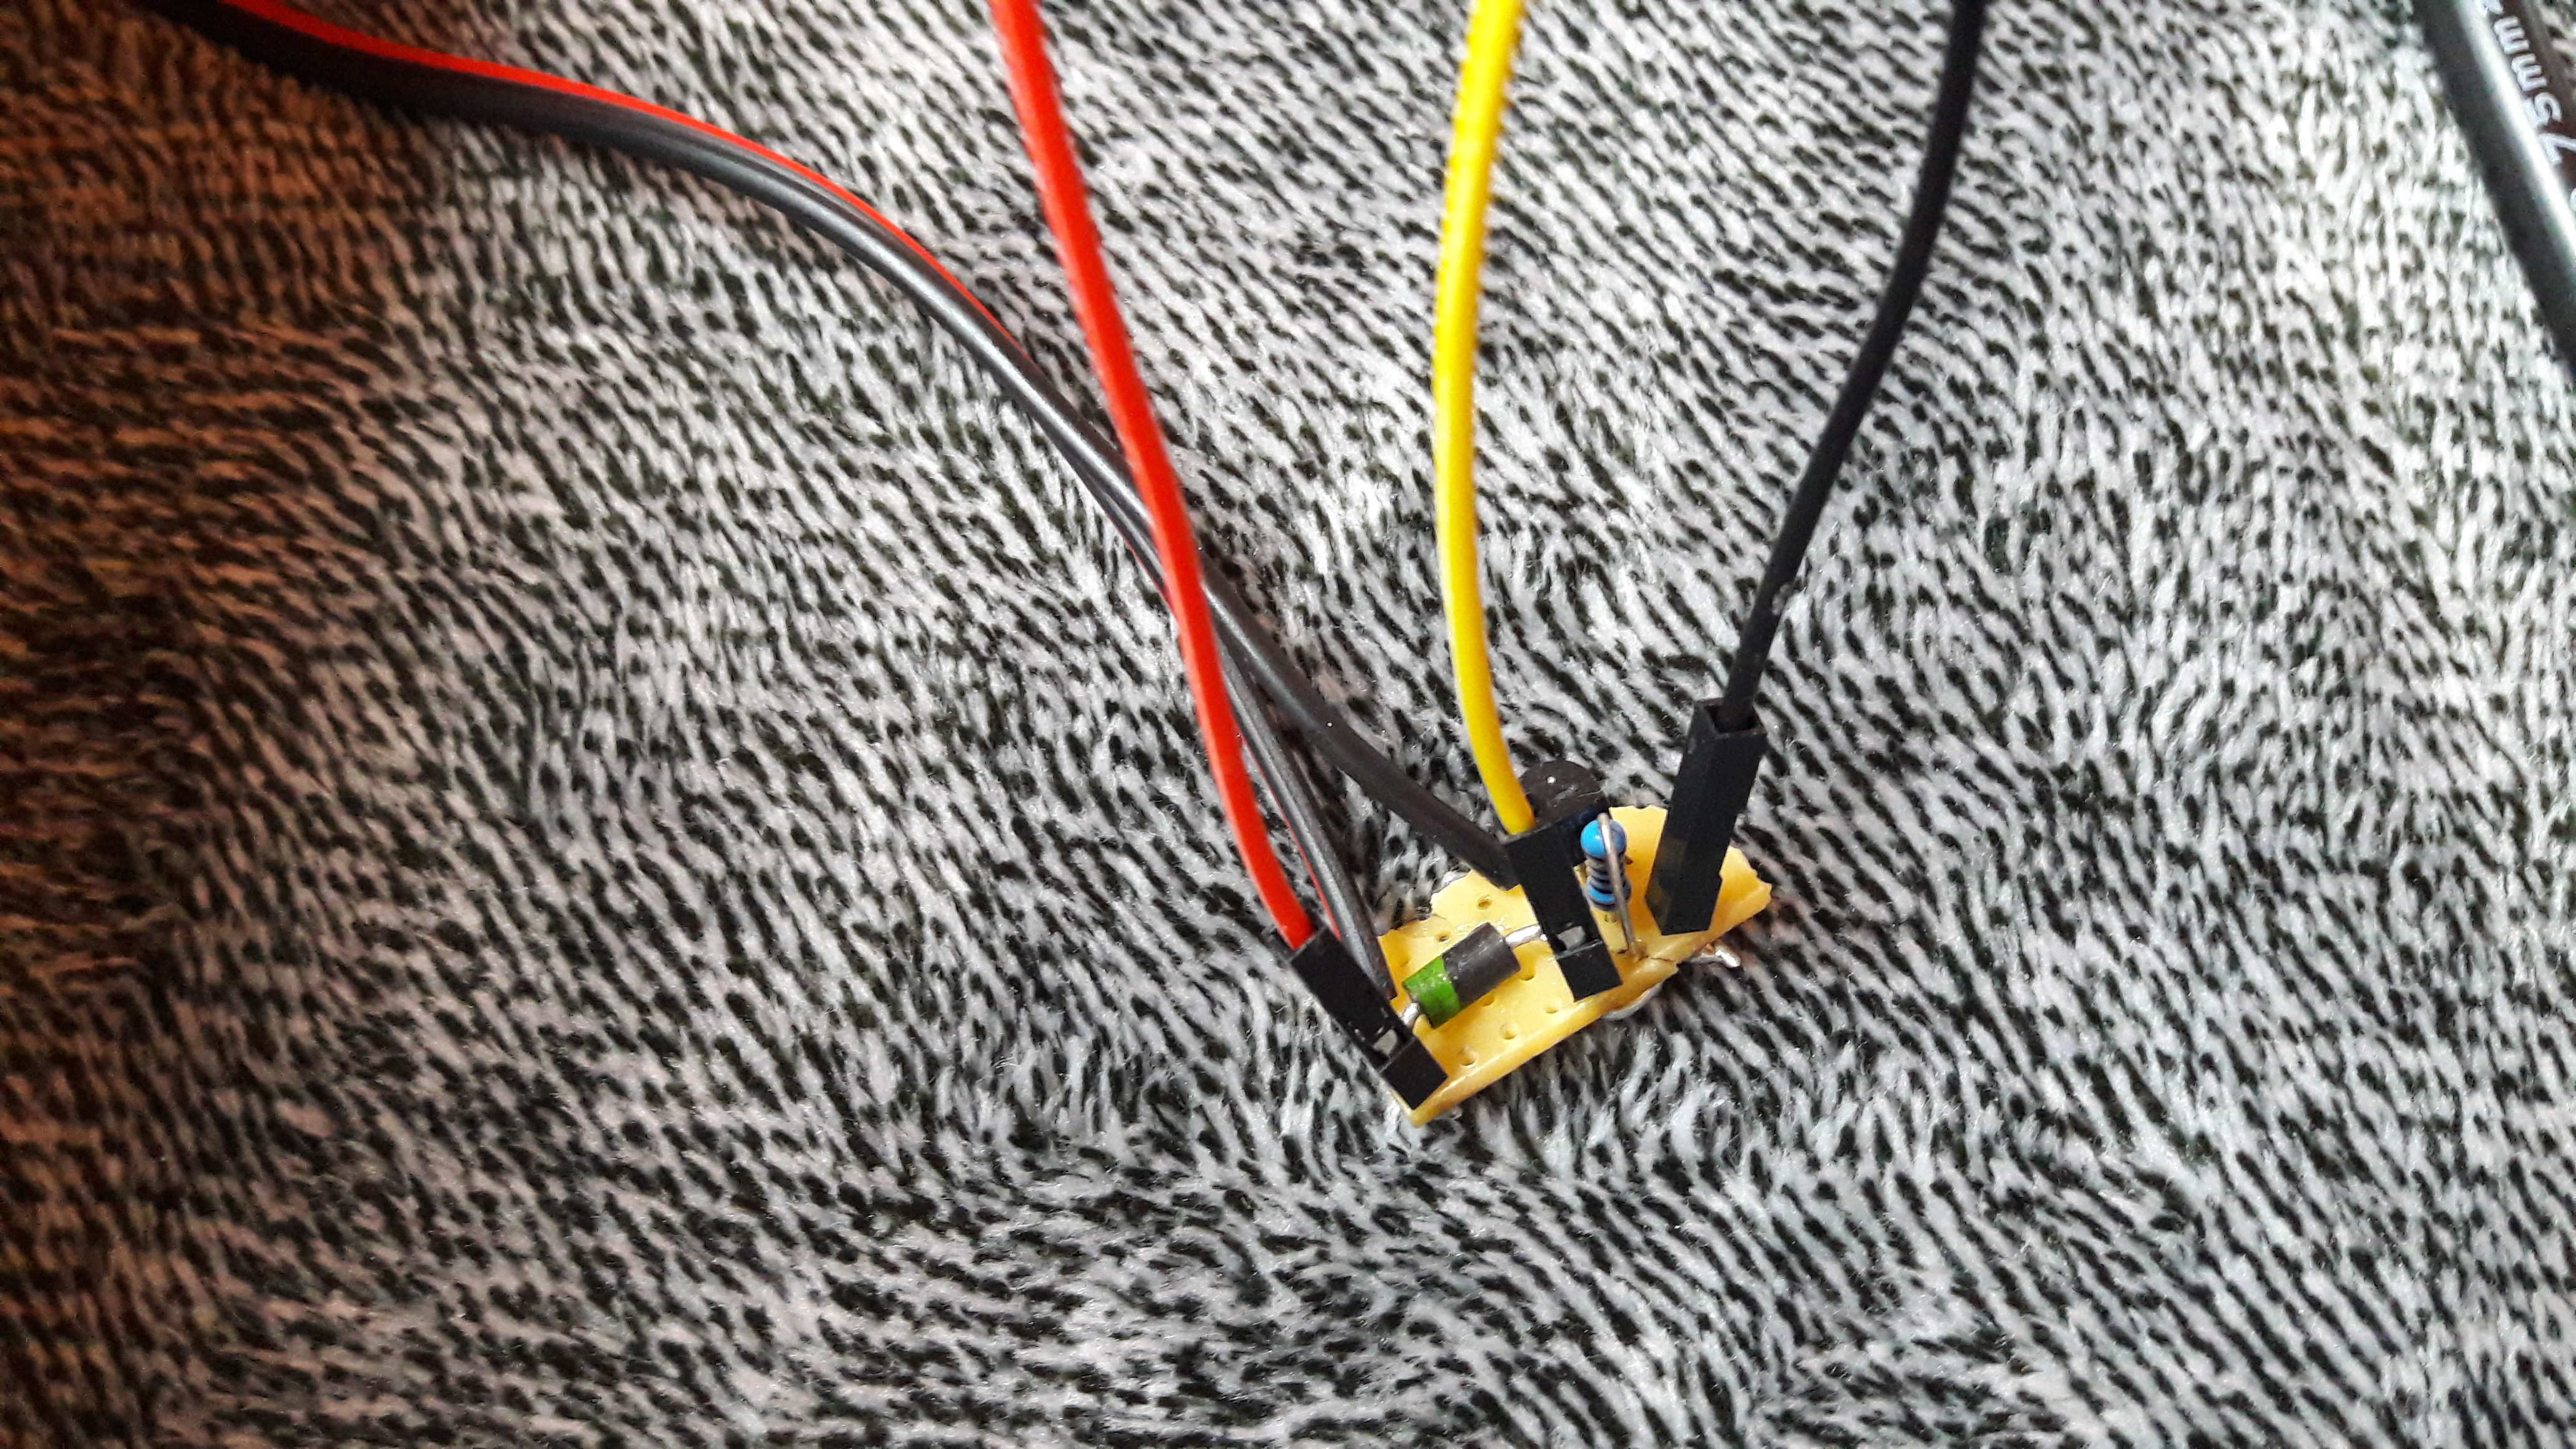
In the next step, connect the diode, transistor, and resistor as the following image shows:
Controlling the lamp from UWP application
Now we are ready to start coding UWP application for Raspberry Pi in order to control GPIO pin connected to our relay. It’s a very easy thing, but don’t forget to add the IoT extension reference to your project. Initializing the GPIO pin should look like this:
private GpioController _gpio;
private GpioPin _pin18;

public MainPage()
{
    this.InitializeComponent();

    _gpio = GpioController.GetDefault();

    _pin18 = _gpio.OpenPin(18);
    _pin18.SetDriveMode(GpioPinDriveMode.Output);
}
Now, when the pin is initialized, we just need to set it is value in order to switch the lamp on or off.
_pin18.Write(GpioPinValue.Low);
Aaand, that’s it!
Part II – Speech Recognition
As you have already made it work, we’re now ready to add speech recognition to be able to turn on or off the lamp by saying the command.
Things you need
- USB Microphone
Speech Recognition service
To detect voice commands we’re going to use a great, built-in SpeechRecognition API.
First of all, set the Microphone device capability in the package.appxmanifest file to get access to the microphone’s audio feed.
Next, create a new class called SpeechRecognitionService.
Basically, all you need to do is start a new SpeechRecognizer, define its grammar (vocabulary), compile it and listen for commands in a loop.
public class SpeechRecognition
{
    private SpeechRecognizer _speechRecognizer;

    private const string LIGHT_ON_STRING = "Hello";
    private const string LIGHT_OFF_STRING = "Bye-bye";

    public async Task Start()
    {
        try
        {
            _speechRecognizer = new SpeechRecognizer(SpeechRecognizer.SystemSpeechLanguage);

            var lightsGrammar = new SpeechRecognitionListConstraint(new string[] { LIGHT_OFF_STRING, LIGHT_ON_STRING }, "light");
            _speechRecognizer.Constraints.Add(lightsGrammar);

            await _speechRecognizer.CompileConstraintsAsync();

            await Task.Factory.StartNew(RecognizeAsync);
        }
        catch
        {
            Stop();
        }
    }

    private async Task RecognizeAsync()
    {
        while (true)
        {
            try
            {
                SpeechRecognitionResult speechRecognitionResult = await _speechRecognizer.RecognizeAsync();

                if (speechRecognitionResult.Status == SpeechRecognitionResultStatus.Success)
                {
                    ProcessSpeechResultText(speechRecognitionResult.Text);
                }
            }
            catch (Exception ex)
            {
                await Start();
            }
        }
    }

    public void Stop()
    {
        _speechRecognizer.Dispose();
    }

    private void ProcessSpeechResultText(string text)
    {
        switch (text)
        {
            case LIGHT_OFF_STRING:
                // turn off..
                break;

            case LIGHT_ON_STRING:
                // turn on..
                break;

            default:
                break;
        }
    }
}
How simple is that? 🙂
Part III – Mobile Application
Yelling on your Raspberry is not always the best solution, so let’s take a look at how to communicate between two C# applications.
When it comes to peer-to-peer communication between UWP and Xamarin apps, we can use TCP Sockets. Unlike UDP, it establishes a long-lasting and reliable connection. However, please note that this implementation is not secured and it’s aimed to use only on private networks.
UWP Server class
First of all, we need to implement a server-side listener, which will listen for any incoming requests. Create a new class with TcpListener property, initialize it, and listen in a loop for any incoming connections. When the connection is established, listen for commands, process them and provide a relevant response back to the client. In this scenario, I’m dealing with strings, however, for bigger projects, it is more reasonable to use serializable classes for commands and responses of your own.
public class TcpSocketServer
{
    private int _port = 6666;
    private TcpListener _server { get; set; }

    public async Task StartAsync()
    {
        try
        {
            _server = new TcpListener(await GetHostPAddressAsync(), _port);
            _server.Start();

            await Task.Factory.StartNew(AcceptClientsAsync);
        }
        catch
        {
            Stop();
        }
    }

    private async Task AcceptClientsAsync()
    {
        while (true)
        {
            var client = await _server.AcceptTcpClientAsync();
            OnConnectionRecevied(client);
        }
    }

    private async void OnConnectionRecevied(TcpClient client)
    {
        var stream = client.GetStream();

        if (!stream.CanRead) return;

        while (true)
        {
            try
            {
                var command = await ReadCommandAsync(stream);
                // Process command here and provide relevant response to the client
                await WriteResponseAsync(stream, "OK");
            }
            catch(Exception ex)
            {
                return;
            }
        }
    }

    public void Stop()
    {
        _server?.Stop();
    }

    private async Task<string> ReadCommandAsync(NetworkStream stream)
    {
        var commandLengthBuffer = new byte[sizeof(uint)];
        if (await stream.ReadAsync(commandLengthBuffer, 0, commandLengthBuffer.Length) != commandLengthBuffer.Length) throw new Exception();

        var commandBuffer = new byte[BitConverter.ToUInt32(commandLengthBuffer, 0)];
        if (await stream.ReadAsync(commandBuffer, 0, commandBuffer.Length) != commandBuffer.Length) throw new Exception();

        var command = Encoding.UTF8.GetString(commandBuffer);

        return command;
    }

    private async Task WriteResponseAsync(NetworkStream stream, string response)
    {
        var responseBuffer = Encoding.UTF8.GetBytes(response);
        var responseLengthBuffer = BitConverter.GetBytes((uint)responseBuffer.Length);

        await stream.WriteAsync(responseLengthBuffer, 0, responseLengthBuffer.Length);
        await stream.WriteAsync(responseBuffer, 0, responseBuffer.Length);
    }

    private async Task<IPAddress> GetHostPAddressAsync()
    {
        var hostName = Dns.GetHostName();
        var adresses = await Dns.GetHostAddressesAsync(hostName);

        return adresses.First(a => a.AddressFamily == AddressFamily.InterNetwork);
    }
}
Xamarin Client
Now, we are ready to implement the client in order to reach our server. Because of different Mono Frameworks for mobile platforms, it’s not possible to create a single class client and use it on iOS, Windows, and Android. Fortunately, the code is 99.9% the same, so all we need to do is copy our class to each project and then use DependencyService to access it from PCL (portable class library).
PCL abstract client
public abstract class SocketClient
{
    public string Host { get; private set; }
    public int Port { get; private set; }

    public void Init(string host, int port)
    {
        Host = host;
        Port = port;
    }

    public abstract Task ConnectAsync();

    public abstract Task<string> SendCommandAsync(string command);

    public abstract void Dispose();
}
Platform-specific client
The platform-specific class inherits from an abstract client implemented in PCL project and is marked with assembly attribute.
[assembly: Xamarin.Forms.Dependency(typeof(TcpSocketClient))]
namespace SmartHome.Droid
{
    public class TcpSocketClient : SocketClient
    {
        private const string UNDERLYING_SOCKET_CLOSED_BEFORE_READ = "The underlying socket was closed before read.";

        private TcpClient _client;
        private NetworkStream _stream;
        private SemaphoreSlim _semaphoreSlim = new SemaphoreSlim(1);

        public override async Task ConnectAsync()
        {
            _client = new TcpClient();

            try
            {
                await _client.ConnectAsync(Host, Port);
            }
            catch
            {
                Dispose();
            }
        }

        public override async Task<string> SendCommandAsync(string command)
        {
            // Wait while previous command is proccessed
            await _semaphoreSlim.WaitAsync();

            try
            {
                // Check connection
                if (_client == null)
                {
                    await ConnectAsync();
                }

                _stream = _client.GetStream();

                await WriteCommandAsync(command);
                var response = await ReadResponseAsync();

                return response;
            }
            catch
            {
                Dispose();
                throw;
            }
            finally
            {
                _semaphoreSlim.Release();
            }
        }

        public override void Dispose()
        {
            _stream?.Dispose();
            _client?.Close();
            _client = null;
        }

        private async Task WriteCommandAsync(string command)
        {
            var commandBuffer = Encoding.UTF8.GetBytes(command);
            var commandBufferLength = BitConverter.GetBytes((uint)commandBuffer.Length);

            await _stream.WriteAsync(commandBufferLength, 0, commandBufferLength.Length);
            await _stream.WriteAsync(commandBuffer, 0, commandBuffer.Length);
        }

        private async Task<string> ReadResponseAsync()
        {
            var responseLengthBuffer = new byte[sizeof(uint)];
            if (await _stream.ReadAsync(responseLengthBuffer, 0, responseLengthBuffer.Length) != responseLengthBuffer.Length) throw new Exception(UNDERLYING_SOCKET_CLOSED_BEFORE_READ);

            var responseBuffer = new byte[BitConverter.ToUInt32(responseLengthBuffer, 0)];
            if (await _stream.ReadAsync(responseBuffer, 0, responseBuffer.Length) != responseBuffer.Length) throw new Exception(UNDERLYING_SOCKET_CLOSED_BEFORE_READ);

            var response = Encoding.UTF8.GetString(responseBuffer);

            return response;
        }
    }
}
Accessing platform-specific client from PCL
SocketClient client = DependencyService.Get<SocketClient>();
Conclusion
And that’s pretty much all from Voice and Wi-Fi controlled Lamp tutorial 🙂
We’ve seen how to control a simple electronic device, either with your voice or mobile phone. Working sample with an alarm clock and internet radio can be found here.
Hope it helps!