Have you ever had troubles to synchronize your data values and its changes between multiple Angular components? Or have you ever tried using popular solutions like Redux, NgRx and felt confused and overwhelmed? If so, then you might find this article on state management in Angular useful.
Sample application
Imagine we have a todo list application where we want to tackle issues like:
- Asynchronous communication with API and UI feedback
- API errors handling
- API calls cancellation
- Data sharing across services, components and application modules
- Auto-save functionality
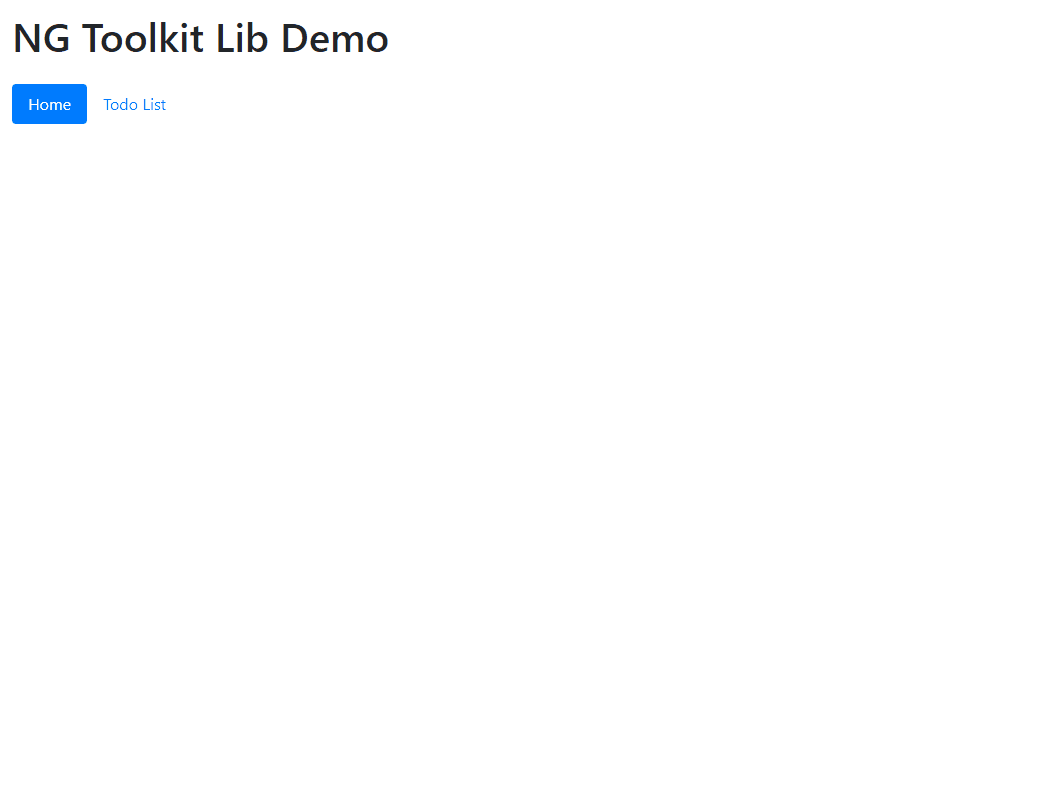
Something just like this:
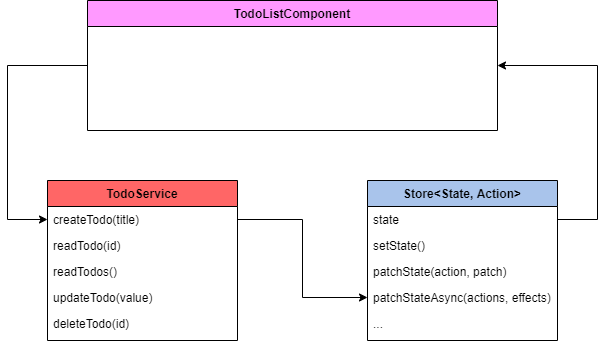
The application is split into components, services and models as following:
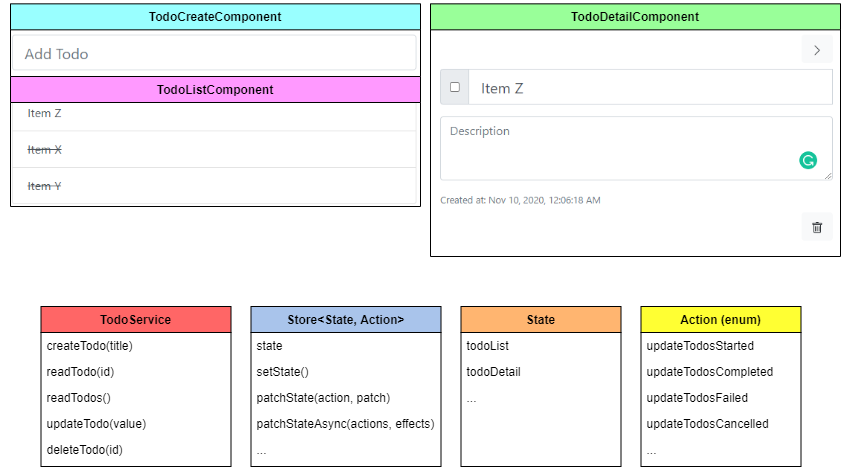
Not very nicely layered application, right? Well, I think it’s all about the point of view because even though we cannot draw horizontal layers, we can draw a circle! 🙂
Defining state and actions
First of all, we need to install an npm package called ng-toolkit-lib.
npm i ng-toolkit-libNow let’s create a file todo-store.ts and declare how our state of the application should look like.
export interface TodoState {
  todos: Dataset<TodoSummary>;
  todo: Detail<TodoDetail>;
}
Our simple state will for now contain two properties, such as a list of filtered todos and a detail of currently selected one. Dataset wraps a list of simplified items with extra properties that specifies whether a list is being busy, how it is paged, sorted and filtered, plus it can contain error details of the last operation. Detail interface then wraps full item detail with progress property and error details of the last operation. For more information on these interfaces take a look at this code.
Once we have the state defined, in the very same file we can write down which actions can occur in our store.
export type TodoAction =
    'clearState'

  | 'createTodoStarted'
  | 'createTodoCompleted'
  | 'createTodoFailed'
  | 'createTodoCancelled'

  | 'readTodosStarted'
  | 'readTodosCompleted'
  | 'readTodosFailed'
  | 'readTodosCancelled'

  | 'readTodoStarted'
  | 'readTodoCompleted'
  | 'readTodoFailed'
  | 'readTodoCancelled'

  | 'updateTodoStarted'
  | 'updateTodoCompleted'
  | 'updateTodoFailed'
  | 'updateTodoCancelled'

  | 'deleteTodoStarted'
  | 'deleteTodoCompleted'
  | 'deleteTodoFailed'
  | 'deleteTodoCancelled';
Unfortunately, to define asynchronous action it requires some code repetition, but very soon once Angular supports Typescript 4.1 we will be able to simplify this to:
type AsyncAction<A extends string> = `${A}Started` | `${A}Completed` | `${A}Failed` | `${A}Cancelled`;

export type TodoAction =
    AsyncAction<'createTodo'>
  | AsyncAction<'readTodos'>
  | AsyncAction<'readTodo'>
  | AsyncAction<'updateTodos'>
  | AsyncAction<'deleteTodos'>;
Pretty cool, right?
The last step in the store declaration is creating its service by inheriting ObservableStore<TState, TAction> and registering within module providers.
@Injectable()
export class TodoStore extends ObservableStore<TodoState, TodoAction> {
  constructor() {
    super({}, { log: !environment.production });
  }
}
Synchronous actions
Once we have our store, we can initiate action on top of the state and specify how it should be changed. This gives us a couple of advantages:
- Whenever we change the data in multiple properties of the state, changes can be applied as a single transaction which makes it harder to interfere with other actions running at the same time.
- It also improves debugging experience, because anytime something is invoked, you can see the details in a console and inspect how the state looked like before and after, or which properties have changed.
The state can be updated synchronously using the function patchState, which accepts two parameters:
- The name of the action
- A patch for the current state.
For example:
this.store.patchState('clearState', {
  todos: null,
  todo: null
});
However, this would be similar to calling setState function, because that one replaces the state instead of applying changes to it.
this.store.setState('clearState', {});Asynchronous action
In business logic, we might also need to communicate with our API and update the store’s state according to the various results. In a new todo.service.ts we need to inject our TodoStore we have created earlier.
export abstract class TodoService {
  abstract createItem(title: string): Observable<void>;
  abstract readItems(): Observable<void>;
  abstract readItem(id: string): Observable<void>;
  abstract updateItem(item: TodoDetail): Observable<void>;
  abstract deleteItem(id: string): Observable<void>;
}

@Injectable()
export class TodoServiceImpl {
  constructor(
    protected todoStore: TodoStore,
    protected apiService: ApiService
  ) { }
  ...
}
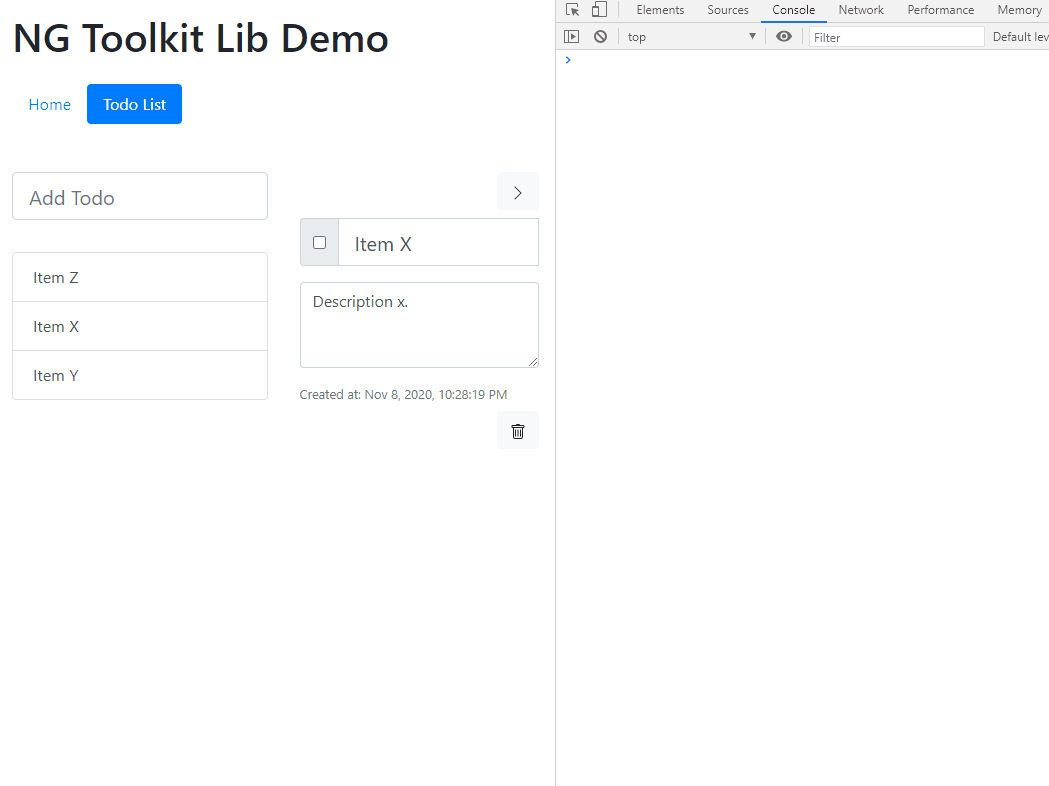
When the service is consuming store and API, we can start implementing our business logic. As an example, I have chosen an operation used to fetch and display detail of a clicked todo item which we can see at the following animation.

What we are trying to achieve here is quite a very common use-case in all SPAs and could be described by the following conditions:
- On item click, we want to show a progress bar and populate detail with basic information.
- Once the detail data is loaded, we want to display additional data in the detail area and hide the progress bar.
- Once the detail data is loaded, we want to clear previous error which could happen during a previous call.
- If loading has failed, we want to hide the progress bar and display an error message to the user.
- If a user has clicked another item during loading the detail of the first one, we want to also hide progress bar and clear error message. This is especially useful if the operation of the loading does not start immediately after the click, but waits at least half a second if a user has not clicked third-item (debounce time).
This leads us to 4 lifecycle events of an API call which can probably cover most of the state changes needed in our application:
- Start
- Completion
- Error
- Cancellation
Therefore, you can find a function on the store called patchStateAsync, which accepts:
- One of the names of the associated actions
- Observable used to initiate an API call
- Effects object where you can provide callbacks for up to 4 lifecycle events mentioned above
In the end, our function to handle the lifecycle of displaying the detail of the item will look as following:
readItem(id: string) {
    return this.todoStore.patchStateAsync(
      'readTodoStarted',
      this.apiService.getItem<TodoDetail>('todo', id),
      {
        started: () => ({
          todo: {
            ...this.todoStore.state.todo,
            isBusy: true,
            item: this.todoStore.state.todos?.items?.find(
              (t) => t.id === id
            ) as TodoDetail,
          },
        }),
        completed: (v) => ({
          todo: {
            ...this.todoStore.state.todo,
            isBusy: false,
            error: null,
            item: v,
          },
        }),
        failed: (e) => ({
          todo: {
            ...this.todoStore.state.todo,
            isBusy: false,
            error: { ...e, message: `Todo could not be loaded. ${e.message}` },
          },
        }),
        cancelled: () => ({
          todo: {
            ...this.todoStore.state.todo,
            isBusy: false,
            error: null,
          },
        }),
      }
    );
  }
We have already seen started and completed effects in action, but let’s also take a look when we can take advantage of failed and cancelled.
Failed might happen when you have no network connection, or API just does not like your request:

And cancelled if we are using auto-save after 2 seconds of inactivity, but during the save user has changed the form once again, or user has navigated away from the component.
Store Component
In order to make things easier, your components can extend StoreComponent class, which will help you to:
- Read any property of the state
- Listen to actions and handle them
- Optimize change detection by specifying on which actions or property changes of the state it should be run
- Automatically unsubscribe calls when a component is destroyed or newer call should be considered
For example, a list component can look like this:
@Component({
selector: 'app-todo-list',
templateUrl: './todo-list.component.html',
styleUrls: ['./todo-list.component.scss'],
changeDetection: ChangeDetectionStrategy.OnPush,
})
export class TodoListComponent
extends ObservableStoreComponent<TodoState, TodoAction>
implements OnInit {
get todos() {
return this.todoStore.state.todos;
}
constructor(
protected todoStore: TodoStore,
protected changeDetectorRef: ChangeDetectorRef,
protected todoService: TodoService
) {
super(todoStore, changeDetectorRef);
}
ngOnInit() {
super.ngOnInit();
this.update();
}
update() {
this.subscribeSafe(
'update',
this.todoService.readItems().pipe(debounceTime(500)),
null
);
}
protected onStateChange(
change: ObservableStateChange<TodoState, TodoAction>
): void {
switch (change.action) {
case 'updateTodoCompleted':
this.update();
break;
}
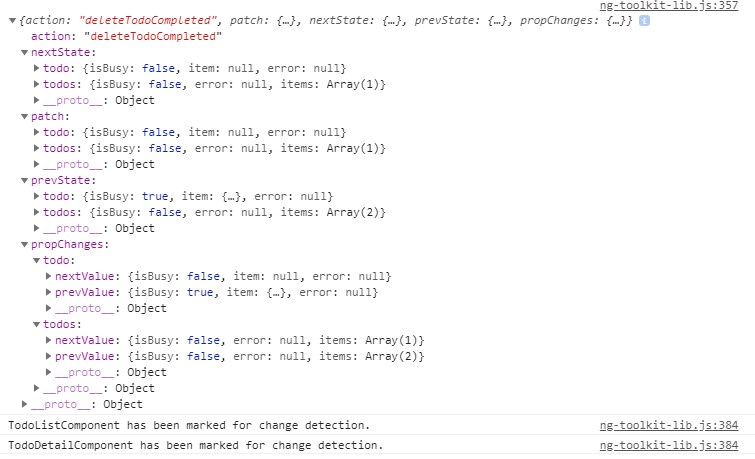
if (change.propChanges.todos) {
this.markForChangeDetection();
}
}
}Once you have inherited the StoreComponent you will have to pass down the store to the base constructor. Afterwards, it will make sure that the component will always be marked for the change detection on state changes. Make sure you have specified changeDetection: ChangeDetectionStrategy.OnPush, so it only updates when the state or component’s input properties have changed.
In bigger applications, you might also want to optimize this behaviour and be in charge of the change detection run. You can easily decide based on action name, property changes or store’s state. For example, the list component will be marked for change detection if any of the actions changed todos property, but you can also compare how each of the properties has changed.
if (change.propChanges.todos) {
  this.markForChangeDetection();
}

...

switch (change.action) {
  case 'createTodoStarted':
  case 'createTodoCompleted':
  case 'createTodoFailed':
    this.markForChangeDetection();
}

...

if (change.propChanges.todos?.prevValue?.items?.length < change.propChanges.todos?.nextValue?.items?.length) {
  this.markForChangeDetection();
}
You can also handle any of the actions or state changes inside each StoreComponent and follow up on them. This can be especially useful if we want to update the list of todos which is always sorted, filtered and paged, while the user has saved changes to the detail opened side-by-side with the list.
switch (change.action) {
  case 'updateTodoCompleted':
    this.update();
    break;
}
Last, but not least, there is a subscribeSafe convenient method, which helps you to forget about the callbacks of some subscription whenever a component is destroyed:

…or a newer request is desired. At that point, it will also call one of the effects specified in a service – cancelled.
Try it now
If you are interested in trying this simple state management approach in Angular application, download the full sample code for todo application on Github and let me know what you think.
Hope it helps!